Studio / ROBLOX
Your first Roblox Studio animation: rigs, keyframes and publishing
Plan a short gesture on a prepared rig, check poses and timing, save the editable work, and separately prepare gameplay use. Editor preview, a published asset and gameplay playback are different stages.
 Open full-size image ↗
1. Choose one clear gesture #
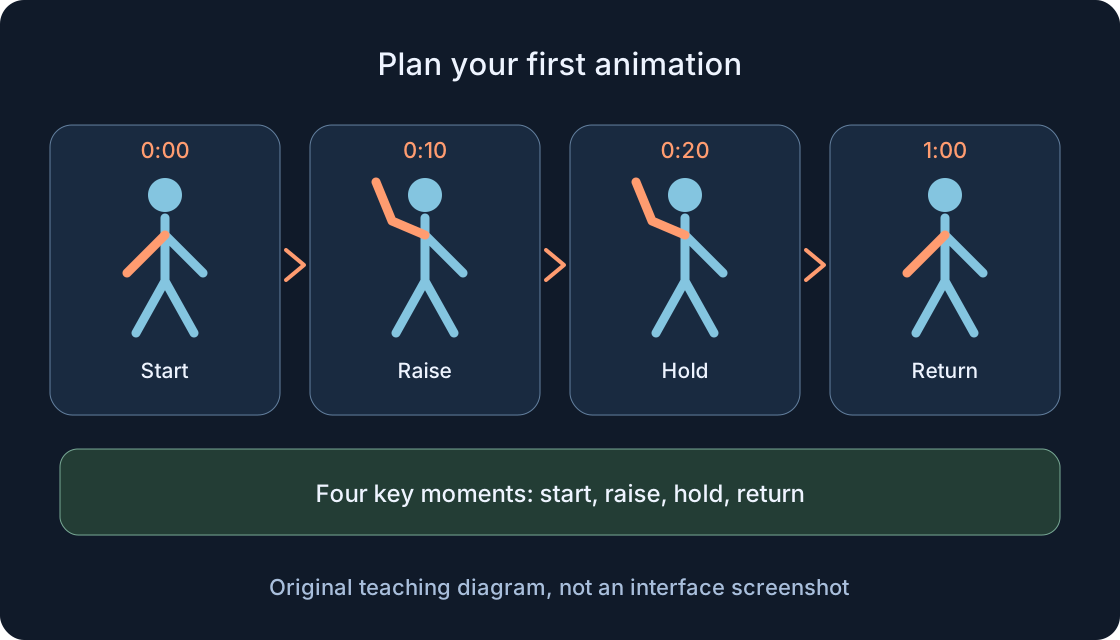
Start with a small greeting: the character raises its right arm, holds briefly, and returns to its starting pose. This is a practice plan, not an animation taken from an author’s game. Record purpose, duration and the visible result: a readable arm movement, no overturned torso, and a calm ending. Begin with one action instead of an entire running, jumping and combat set.
Before opening tools, draw three positions on paper: start, gesture and return. Decide which body parts actually need to move. A greeting need not animate the legs or move the whole character through the scene. Fewer independent changes make faults easier to understand. Decide whether it is a one-shot gesture; that choice affects the final pose and repeat-start check. The first diagram describes the working stages rather than a screenshot of a completed project.
2. Separate mesh, rig and animation asset #
A mesh describes geometry, but a visible figure does not guarantee controllable connections. A rig is a prepared structure with body parts and joints; Motor6D or Bone can provide the moving structure. An animation describes poses changing over time. Its published asset is neither the character model nor a button that automatically starts the action.
Do not try to fix missing joints by inserting another AnimationId. First establish that the selected model can be animated. A name such as “Greeting” helps people, but does not replace an asset identifier: different works may have identical titles. An editable draft saved within a place also differs from a published asset. The first table helps record the model, editable clip, published reference and a particular session’s playback track separately, rather than treating them as interchangeable objects.
| Entity | Purpose | Do not confuse it with |
|---|---|---|
| Mesh | Visible object geometry | A jointed, animation-ready rig |
| Rig | Parts and connections | An animation asset |
| Saved clip | Editable work within a place | Saving the entire project |
| Published animation | Asset with a real ID and owner | Its title or its initiation |
| AnimationTrack | A track loaded on Animator | The published asset itself |
3. Prepare a compatible rig #
Use a prepared rig matching the character you intend to animate. If none is present, the current Rig Generator route is Avatar or Home → Character. Choose the appropriate option; R6 and R15 have different structures. For the first exercise, keeping one standard R15 and recording its type is more useful than swapping bodies between every preview.
Put the practice model in a clear separate part of the project and give it a distinguishable name. Inspect the relevant parts and joints in Explorer; avoid accidental renaming. Compatibility depends on structure and required joints rather than identical colours or body size. Moving the clip to another rig later requires a separate check. For a custom imported model, prepare the structure first: this lesson does not turn arbitrary geometry into a ready skeleton merely by naming it Rig.
4. Open the editor and name the work #
Open Animation Editor from Avatar or Window → Avatar. Select the prepared rig in the 3D viewport or Explorer. In the new-animation flow, enter Animation Name and choose Create. Use a name explaining the action and revision, such as “GreetingPractice_v1”, so you can distinguish the work from a later edit.
Locate playback controls, the track list and the timeline immediately. Confirm that you are editing the intended model, not a neighbouring character with a similar name. Record the rig linked to the work. If its parts cannot be selected as expected, investigate the structure before making poses. Publishing is not necessary to check whether the editor opened: creation, preview and saving let you assess the movement itself before deciding to publish an asset.
5. Establish the initial pose #
The starting pose makes the gesture reproducible. Put the scrubber at the beginning and check the arm’s neutral position. To add tracks for every body part, the current official tutorial uses + → Add All Body, followed by contextual keyframe insertion in the timeline’s upper region. Check the actual markers afterward, not just the scrubber location.
Avoid turning the starting frame into an accidental whole-body lean. Maintain a clear reference: legs and torso positioned as intended, the selected arm not yet raised. This is a comparison baseline, not a mandatory artistic pose for every character. Later, assess how tracks for parts unnecessary to the gesture interact with other movements. For now, you need a clearly visible start and a way to return to that specific pose instead of reconstructing an approximate version from memory.
6. Place the key moments in time #
The practice plan has four moments: initial pose, raised arm, brief hold and return. The table proposes times for a 30-frame-per-second timeline; these are not measured results. The editor’s default display is seconds:frames, so 0:15 means half a second at that frame rate, not fifteen seconds. If the rate changes, recalculate frames or work from seconds.
Move the scrubber to the intended time, then change the selected part’s pose. The editor creates a keyframe when the pose changes. Copy the raised pose to the next moment for the hold, and the initial pose for the finish. Check which tracks actually received keys. Add Keyframe Here inserts near the click position, not necessarily at the scrubber; inspect the resulting time. Leave the worksheet’s result column empty until you have made an observation in preview.
| Time at 30 fps | Proposed pose | Check to make | Result — fill later |
|---|---|---|---|
| 0:00 | Neutral beginning | Arm not raised; torso stable | |
| 0:10 | Raised arm | Shoulder and elbow without intersections | |
| 0:20 | Hold the pose | Position matches the raised pose | |
| 1:00 | Return to start | Initial pose restored |
7. Pose body parts gradually #
Raise the arm through small changes, inspecting shoulder and elbow from several angles. Avoid setting a large angle on every part at once; that can produce intersections with the torso or an awkward bend. Establish a readable main pose first, then refine the hand and head only if they help communicate the greeting.
Check that you are changing the joint pose rather than moving the entire practice model through the scene. Compare the silhouette with the beginning: is the greeting visible at ordinary gameplay distance? Reduce its amplitude and preview again if needed. Keep intermediate states simple. More keys do not automatically improve movement: a difficult track can hide an accidental rotation. Four purposeful positions with an explanation for each are more useful in the first version than dozens of changes whose purpose has been forgotten.
8. Preview timing and transitions #
Use Play in the editor’s own controls, or Spacebar while focus is in the editor. Watch the complete gesture, then scrub across a problematic interval. Inspect the beginning, move to the raised arm, hold and return separately. Compare front and side views; one camera angle can conceal intersecting body parts.
Correct a specific defect first: an incorrect time, unwanted turn or lost final pose. Then adjust transitions if the motion remains abrupt. Do not change every interval and easing setting together; the comparison will lose meaning. Keep Looping off for the one-shot greeting. If you later want a cycle, reconcile its first and last poses: enabling looping alone does not produce a smooth seam. Preview establishes only the movement observed in the editor, not initiation inside a published experience.
9. Save the clip and the project separately #
Open ⋯ in the editor’s playback area and choose Save or Save As. This preserves the animation work within the place structure; the current reference describes a KeyframeSequence in ServerStorage and a reference associated with the rig. Use a distinct revision name so the first version remains identifiable among similar entries.
Saving the clip does not save the whole project or publish an animation asset. Save the place separately using your project’s normal method, then verify that the intended work opens again in the editor. Do not test preservation by deleting the original. The second diagram distinguishes saved work, a published asset and verified gameplay playback. If you stopped at the first stage, record that state. A familiar title in a list is not evidence that an AnimationId has been created.
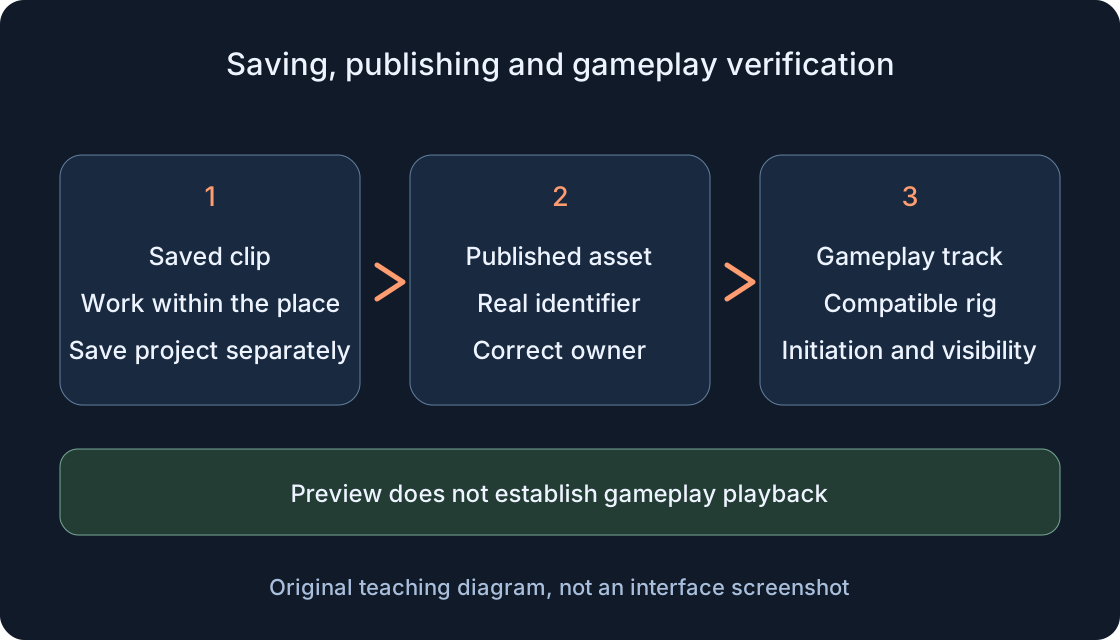 Open full-size image ↗
10. Prepare publication under the correct owner #
After preparing and saving the movement, the editor route is ⋯ → Publish to Roblox → Asset Configuration. Check title, description and Creator. For a group-owned experience, the official route calls for selecting that group in Creator. Establish your account’s authority beforehand; do not publish personally just because that context opened first.
Before confirmation, compare the target experience and owner, and finish submission only when you intend to publish your material. Final button wording can differ between current windows and tutorials, so follow the action’s purpose. After successful publication, record the real identifier and page; Creator Dashboard lists the work under Development Items → Animations. rbxassetid://ANIMATION_ASSET_ID is only a nonworking reference placeholder here. Publishing the animation does not publish the project, attach a trigger, or repair an incompatible rig.
11. Plan gameplay playback #
The gameplay route uses Animation with AnimationId, loads it through Animator:LoadAnimation to create AnimationTrack, and then plays that track. For a character with Humanoid, Animator is its child; a non-Humanoid rig uses AnimationController with a child Animator. This is an integration outline, not a ready verified implementation for every model.
Visibility to others depends on where Animator is created and playback begins. Current API describes server-created Animator, local-player client initiation for Player.Character, and server initiation outside player characters. Animator must be in Workspace when loading. Do not create another track every frame merely to find an existing one. Plan trigger, ending, repetition and priority separately: competing movements can alter the visible pose. Maximum priority is not a universal repair. Check the detailed gameplay integration separately from your editor-authored gesture.
12. Write a test plan and hand over the work #
Prepare checks without prefilled successes: the saved clip reopens; all four poses read clearly; the gesture returns to the initial position; publication identifies the intended revision and owner; the trigger plays the correct track on a compatible rig; another client sees the intended movement. Leave actual result and date fields for each check. Gameplay-session checks happen later, separately from preview.
When reporting a problem, record rig name, structure type, clip revision, real asset ID, owner, target experience, trigger and exact Output message. Add place, time and observation context, including parts that moved unexpectedly. Exclude passwords and private data. Give teammates the saved work and its purpose together: “short greeting without torso translation, one-shot return to neutral”. The next revision can then use a clear aim and observation instead of a guess based on the animation’s title.
Original sources
Roblox Creator Hub — Animation EditorRoblox Creator Hub — Rig Generator
Roblox Creator Hub — Create character animations
Roblox Creator Hub — Use animations
Roblox Creator Hub — Animator and replication context
Roblox Creator Hub — Animation asset reference
Roblox Creator Hub — AnimationTrack and priorities
Roblox Creator Hub — AnimationController