Studio / ROBLOX
Your first Roblox Studio island: terrain, shore and a walkable route
Build a small learning island with Terrain Editor: bounded land, water, materials and a readable path. Saving the scene and checking it with a character are separate steps.
 Open full-size image ↗
A small island with one clear job #
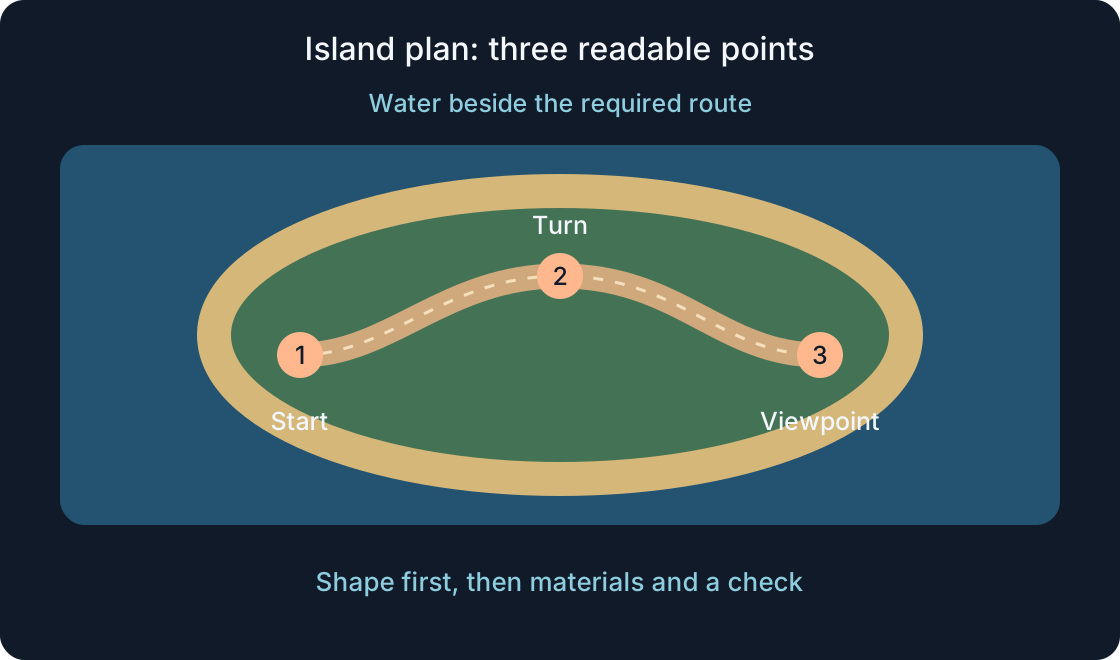
In our fictional learning project, the player appears on a dry platform, follows a path to a shoreline viewpoint and returns. There is no race, reward or progress-saving system. The island’s job is to offer a readable route across terrain, rather than look like an enormous world on the first attempt.
Sketch three places: the start, a turn in the path and the endpoint beside the shore. Keep water beside the required route rather than across it. Our initial plan uses a land volume of 96×16×96 studs and a path roughly 12 studs wide. These are our teaching choices, not optimal dimensions for every avatar. Walkability must be checked with a character. A small scene makes it easier to see which part of the route a particular edit changed.
Start separately and save the baseline #
Open a separate project using the Baseplate template, which includes a SpawnLocation and starting baseplate. Use File → Save to File to keep a local baseline, named clearly, such as island-start.rbxl. Do not edit a working game’s terrain for this exercise: region tools can affect more than the current camera angle reveals.
Find Workspace, Terrain, SpawnLocation and Baseplate in Explorer. The baseplate is an ordinary part, not your future island. Once the land foundation exists, remove that plate from the learning scene so the character does not walk on a hidden floor instead of the terrain. Do not start a character check before land and a spawn area are ready. Keeping separate baseline and later files gives you an understandable state to return to.
Terrain and Parts have different roles #
Terrain stores environmental shape in a voxel grid; each voxel region measures 4×4×4 studs. A brush therefore edits an environmental volume rather than a collection of individual bricks in Explorer. Selecting Workspace → Terrain selects the terrain object; use the editor’s tools to work on a particular region within it.
Parts are useful for signs, platforms and precisely built structures. In this lesson, land and water are terrain, while a small endpoint marker can be your own part. Do not try to move the island as if it were a group of parts: the regional Transform tool works on a selected terrain volume. Material is more than a cover colour; it affects appearance and physical properties. A transparent blue Part remains a part and does not substitute for Terrain’s Water material.
Open the current Terrain Editor #
Terrain Editor is available from the Home toolbar or Window → 3D. Create contains Import, Generate and Clear; Edit contains region and brush tools. For this small, controlled exercise, begin with Fill under Edit rather than generate a large map.
Generate is useful for another kind of starting shape: it produces terrain within the chosen region using its settings. Seed participates in determining the shape, but there is no special number here that guarantees a convenient island. Import uses heightmaps and other input assets that this exercise does not need. Before acting, check the tool name and the selection’s size and position. The camera may display only a fraction of the selected region, so an attractive view is no substitute for reading the settings.
Create a bounded volume of land #
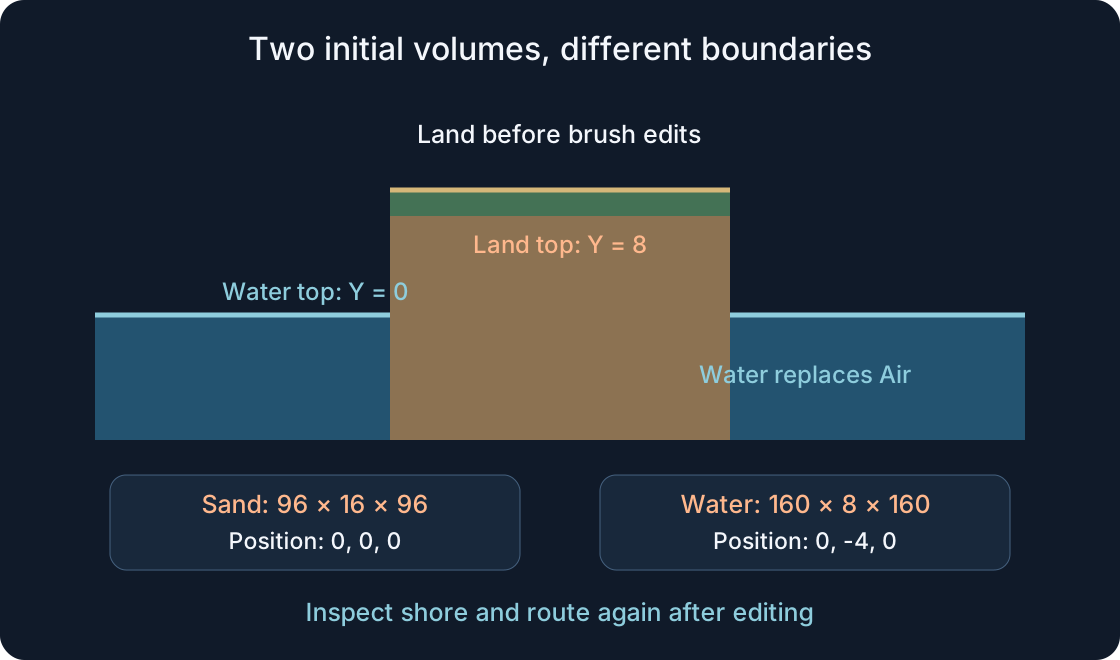
Under Edit, choose Fill. In Selection Settings enter Size 96, 16, 96 and Position 0, 0, 0. If voxel snapping is enabled, check the resulting selection boundaries again. In Material Settings choose Fill Mode — Fill and Source Material — Sand. Inspect the volume outline from the side, then perform the fill.
This produces a planned rectangular starting volume, not a finished coastline. The specified volume’s upper boundary is Y=8; later brush edits will change its shape. Do not fill a large area again just to repair one corner. Remove Baseplate from the practice scene and inspect the land from several directions. Save an intermediate copy before reshaping the shore, keeping the plain foundation as a clear comparison point.
Shape the shore and path gradually #
Sculpt adds or subtracts terrain with adjustable strength. For initial short edits, you could choose brush size 16 and Strength 0.2. These are our starting settings; reduce them if the change is too coarse. Use Subtract to alter the outside corners gently, leaving the start and central route alone.
Smooth softens abrupt transitions. Flatten levels terrain relative to a displayed plane: first establish the reference on the intended dry area, check the mode, and then work along the path in short strokes. Flatten All can both remove projections and fill depressions; it does not merely cut off the top. Keep a gradual approach to the shore and enough room to turn. Do not smooth the whole island automatically, since a useful platform can change along with the attractive slope.
| Tool | Our task | Control |
|---|---|---|
| Fill / Fill | Initial Sand land | Overwrites the whole selected volume |
| Sculpt / Subtract | Refine outside corners | Small area and short strokes |
| Smooth / Flatten | Transitions and route | Plane/mode and neighbouring platform |
| Paint | Grass, Sand and Ground as cues | Material does not fill a gap |
| Fill / Replace | Air → Water in bounded volume | Source, target and top boundary |
| Sea Level | Another way to align water | Operation region, not surface colour |
Use materials to make the route readable #
Choose Paint and its Paint mode. You can use Grass for the dry interior, retaining Sand at the shore. Mark the path using Ground. This is our learning scene’s palette: the aim is to distinguish path and shoreline, not reproduce a particular real island. Use a small brush so one broad stroke does not repaint the whole route.
Paint changes existing terrain material and does not construct a bridge across empty space. If the route has a gap, repair the shape before its appearance. Look at the path from character height: can you see its turn and continuation beyond a small rise? Colour alone is insufficient when the camera hides the surface. Combine the material cue with an understandable route shape and the placement of your own endpoint marker.
Add water while retaining the land #
Save the dry version before adding water. In Fill, set a bounded water region with Size 160, 8, 160 and Position 0, -4, 0. Choose Fill Mode — Replace, Source Material — Air and Target Material — Water. Check the outline, then perform Replace. The planned region’s upper boundary is Y=0, below the starting land’s top.
The distinction matters: replacing Air fills the corresponding empty areas, whereas an ordinary Water fill would overwrite the selected volume. Sea Level is another tool for a consistent water level within a region; do not confuse it with painting a shore. Inspect surfaces and boundaries after the operation. Water appearance is configured on Terrain, but changing colour or waves does not move the land or repair an impassable path.
 Open full-size image ↗
Place the spawn and identify the endpoint #
Move SpawnLocation above the dry starting area with height clearance and no obstructing ceiling. The spawn part’s position and where the character actually lands need separate checking. A spawn icon above the island in an overhead view does not establish that the start works.
Place your own simple marker at the viewpoint, visible from the final turn without obstructing passage. Keep the mandatory route dry; entering water is a separate behaviour to choose for a future project. Inspect the edge from eye level as well as above. If the player can easily leave the shore, record the intended way back and check it later. Do not add an invisible barrier merely to disguise a confusing route. A clear destination should help someone who has not seen your sketch.
Edit one question at a time #
Before each edit, name the problem: “the climb is too abrupt,” “the turn is hidden,” or “water reaches the start.” Change the corresponding small area and compare against the previous state. If a stroke damages an adjacent platform, undo the action and inspect the restored appearance; the saved copy remains a separate recovery point.
Clear under Create clears all terrain in the place, not just the selected island. To remove a local fragment, use an appropriate selected region or subtraction mode and check its boundaries first. Do not confuse terrain removal with deleting Baseplate. Save another file version after a few understandable changes. Tracing a shoreline change to one action is easier than reconstructing a long series of brush strokes from memory.
Check with a character, not just a camera #
Plan a Test session with a character, for example F5, to check the route. Run without a character does not answer whether a player can walk up the slope. Walk from spawn to the marker and back using ordinary movement, then inspect the shore separately. Record the specific place where movement or orientation fails, rather than merely write “the island works.”
The table below is an unfilled plan, not a completed test. Actual results belong to the reviewer. After stopping the session, change the authored scene in editing and repeat the relevant segment. A Studio check does not guarantee phone usability or real-device frame rate. A future release needs separate observations on the intended devices and with the characters that the game permits. Scene size alone does not establish performance.
| Check | Expected | Actual | Decision |
|---|---|---|---|
| Spawn | Character on dry start, not below island | — | — |
| Main route | To marker and back using ordinary movement | — | — |
| Turn / climb | Continuation visible; no unexpected sticking | — | — |
| Shore / water | Required path dry; return from water as planned | — | — |
| Repeated edit | Changed segment checked again | — | — |
| File / device | Version saved; device and result recorded | — | — |
Save the island and choose one next step #
A stopped session does not replace saving your authored scene. Back in editing, use File → Save to File to create the next local version, such as island-route-v1.rbxl. Record region settings, the main edit sequence, path material, spawn placement and results actually obtained. Saving the place file does not implement player-progress saving.
Once the foundation is clear, choose one next task: improve the approach to the shore, replace the marker with your own structure, or check the route on another device. Do not enlarge the map just for a sense of scale. A learning island is useful as a reproducible scene with explainable choices. Related guides help with level-test planning and the distinction between project, place and file; an attractive island image remains an illustration, not proof that the route is walkable.
Original sources
Roblox Creator Hub — Terrain EditorRoblox Creator Hub — Environmental terrain
Roblox Creator Hub — Terrain API
Roblox Creator Hub — Materials
Roblox Creator Hub — Templates
Roblox Creator Hub — Place files
Roblox Creator Hub — Testing modes
Roblox Creator Hub — Terrain environment tutorial